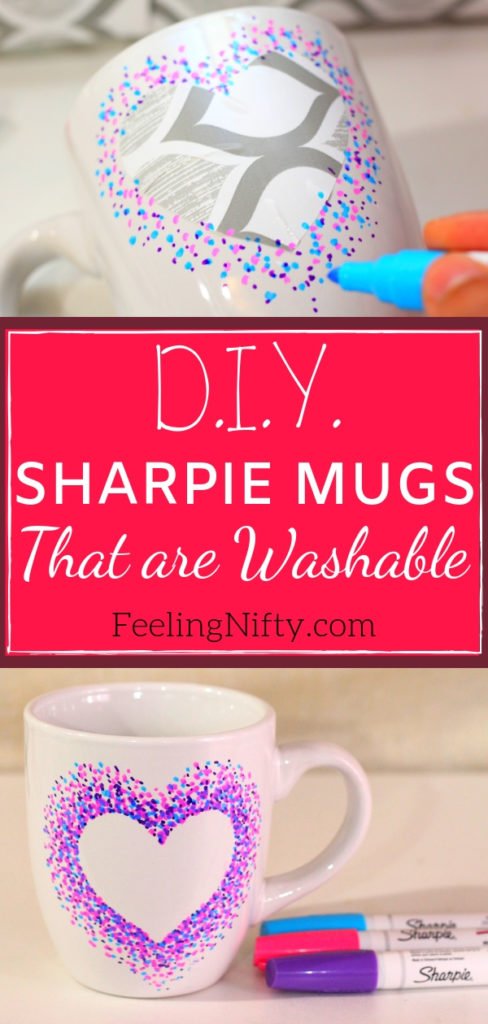
How to Make a DIY Sharpie Mug that's Washable!
Create this beautiful, gift-worthy Sharpie mug with some simple markers and a mug. And you'll learn what to do so your beautiful designs don't wash off!
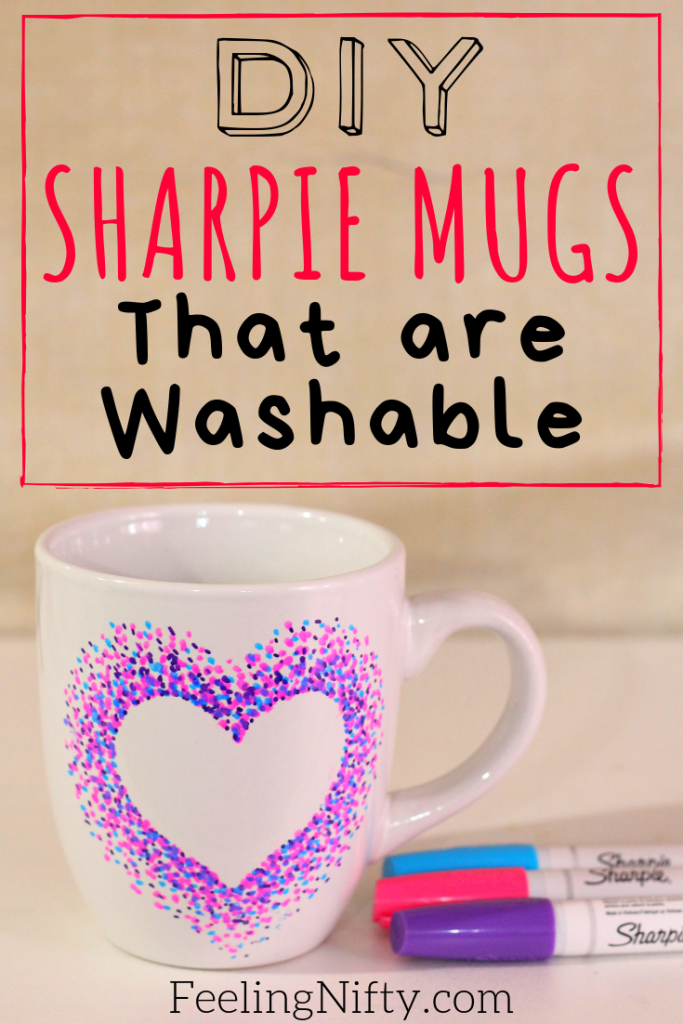
Sharpie mugs are a super popular craft, that make great gifts for birthdays or holidays, and would make a perfect mothers day gift! After seeing how gorgeous they are, you might even want to make one for yourself!
I ended up making 3 of them, because they were so fun to make. Check out my moustache Sharpie mug that I gave to my husband on father's day!
In this tutorial, I will show you, step by step, how to make these super cute mugs. No fancy artistic skills needed....if you can make dots with a Sharpie, then you can do this!
If you're looking for design inspirations to put on your mugs, then check out this 51 Pottery Painting Ideas post. And just incase you want to use acrylic paint on your mug, this acrylic paint on ceramic post will fill you in on all the deets! Or if you're looking for more easy crafts to make check out this 71+ crafts for adults post for inspiration.
What is a DIY Sharpie Mug?
If you're not familiar with what Sharpie mugs are, then your in for a treat! When I first discovered them, I was super amazed and couldn't wait to try it myself.
Basically you use Sharpie markers to draw designs on a plain mug. Once you're happy with it, you bake it in the oven to set the marker design in.
And you can wash it too! You just have to make sure you use the right type of Sharpie, which brings me to my next point...
Use a Cheap Mug
This DIY works best with cheap Dollarstore (Dollartree in particular) ceramic mugs. This is because there is less glaze on them so the paint can adhere better to the ceramic when baked in the oven).
Choose the Right Sharpie For Mugs
To make your Sharpie mug washable and usable, you need to make sure you use an oil-based Sharpie marker.
You can buy them in the store in the same section you get the regular Sharpies from. They will say "Oil-based" on them.
If you use the regular Sharpie's, they will wash away when you clean them. This is because regular Sharpie's are water-based. Anytime water touches paints that are water-based, it tends to wash away.
Since oil and water don't mix, the oil-based paints shouldn't be affected by water touching it.
Baking it in the oven seals it even more. I will talk about this in more detail a little later on.
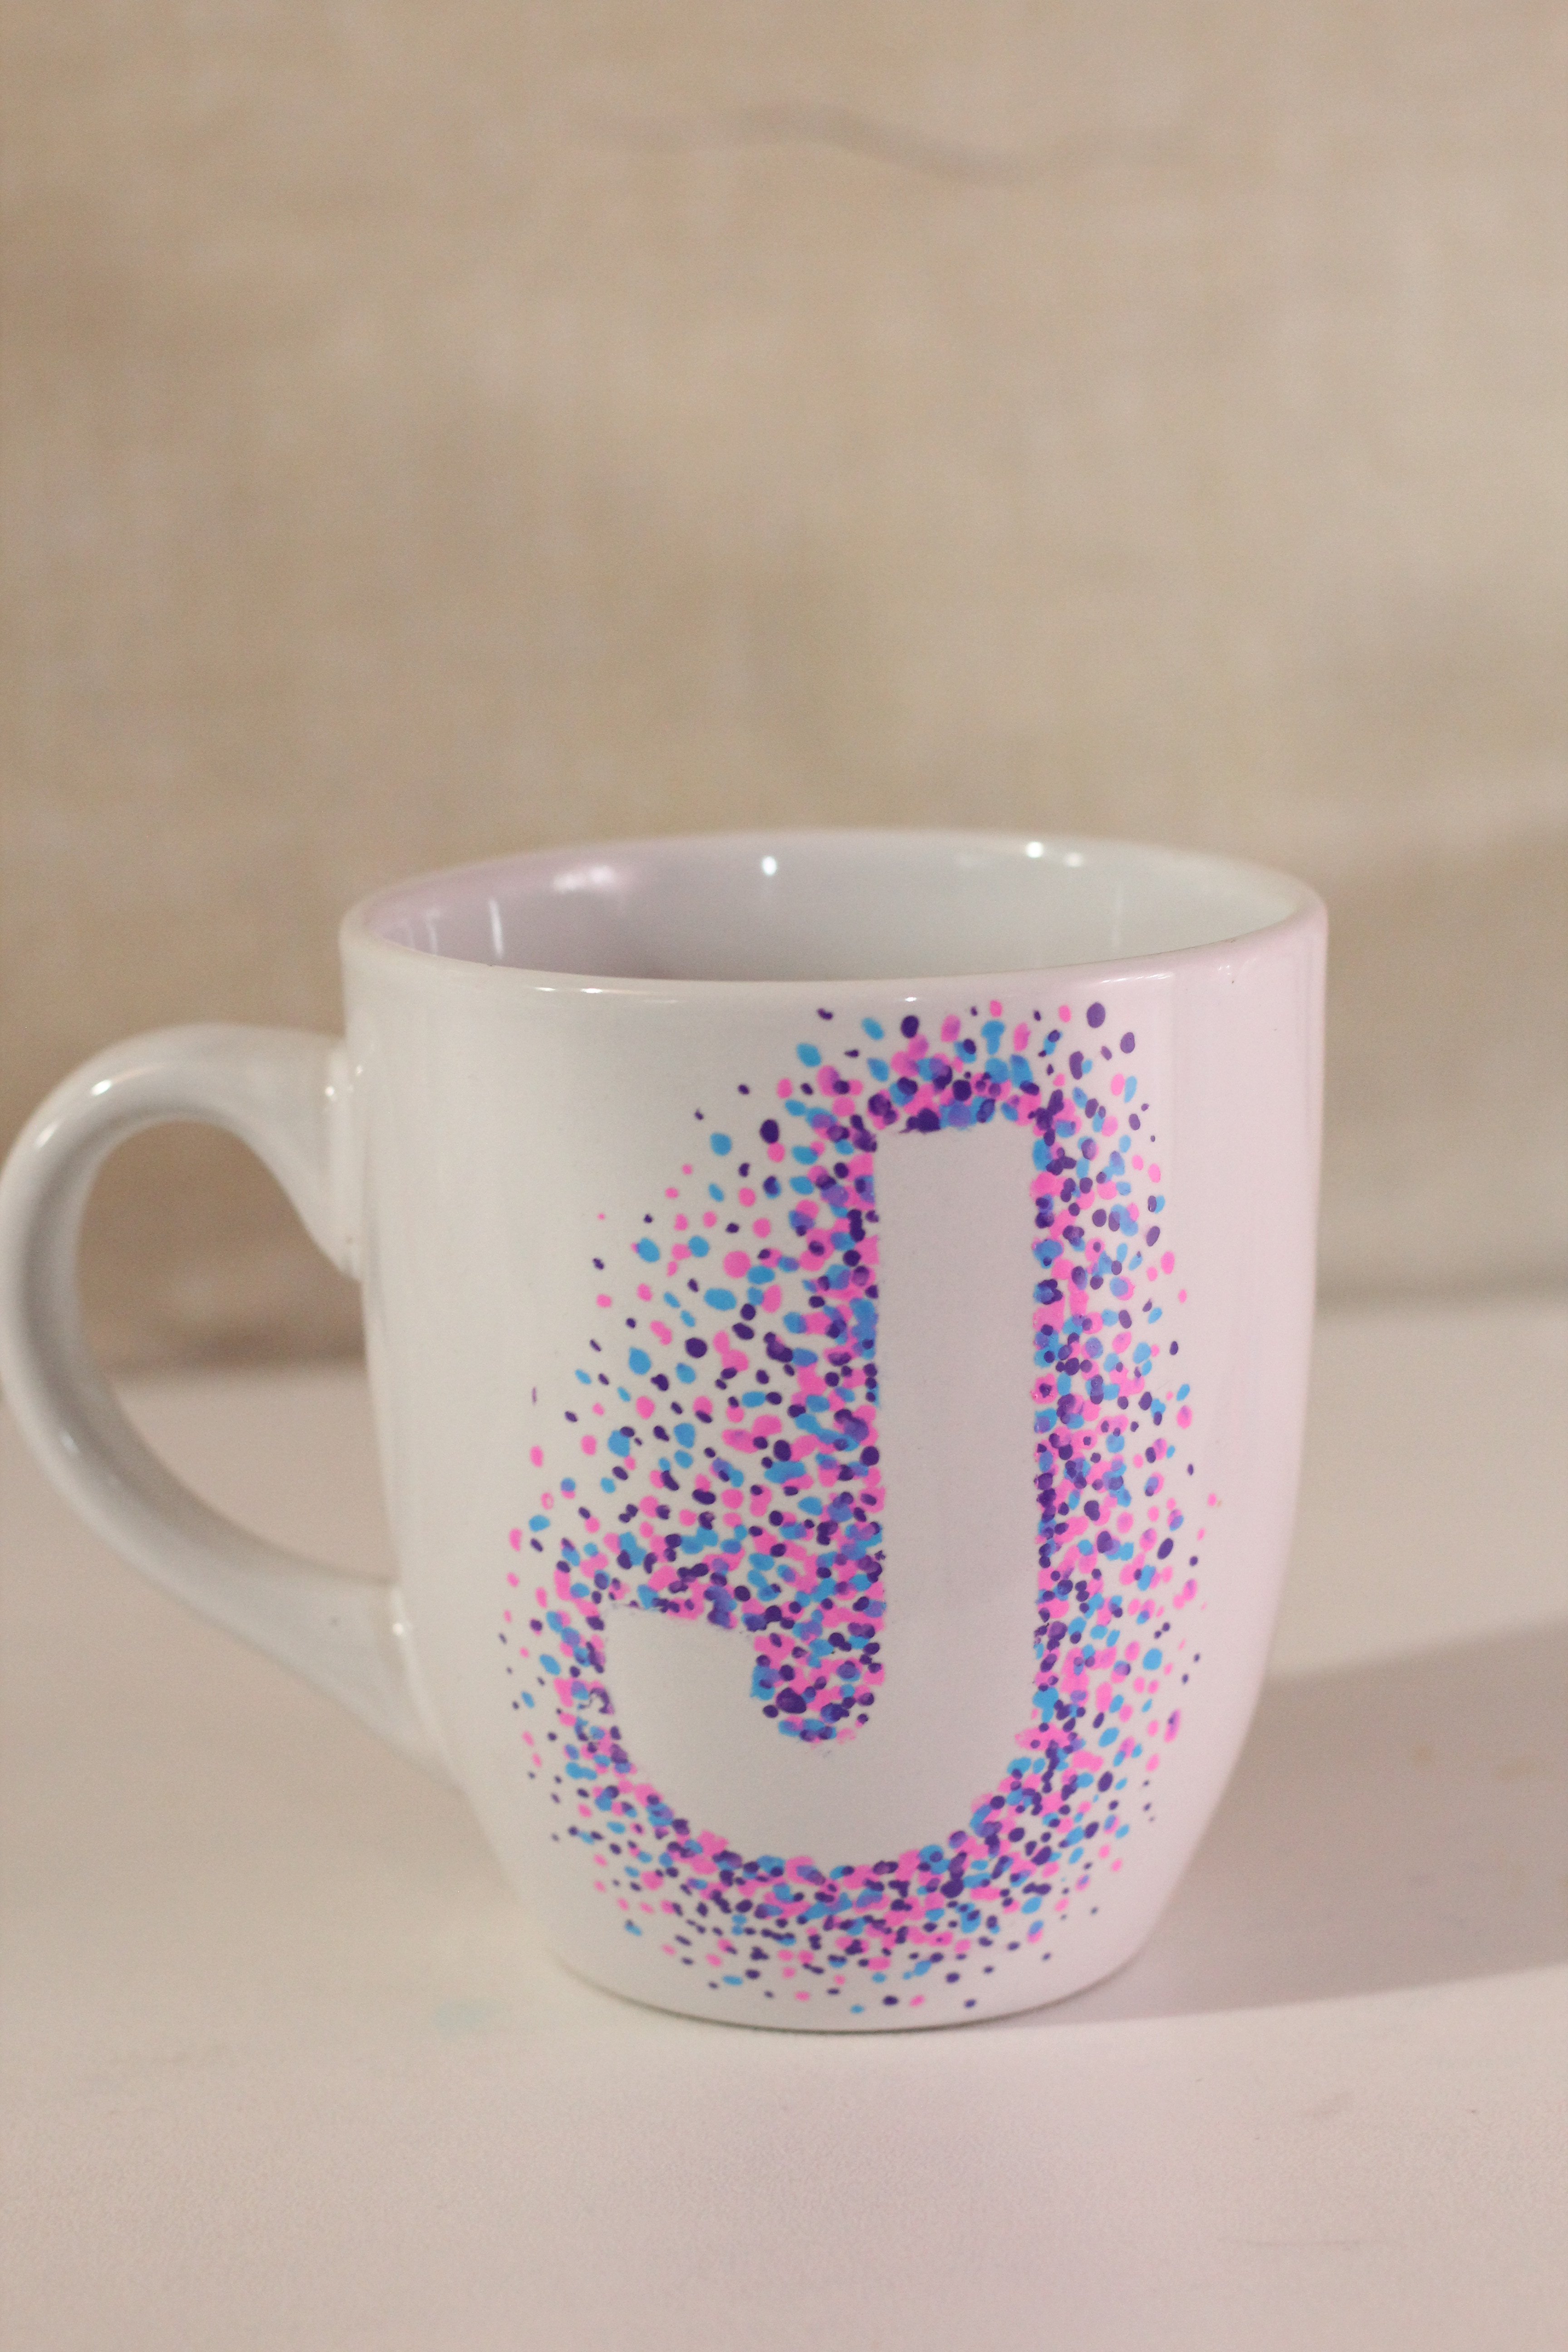
Sharpie Mug Ideas
You can draw anything on your Sharpie mug and make it as custom and personalized as you want.
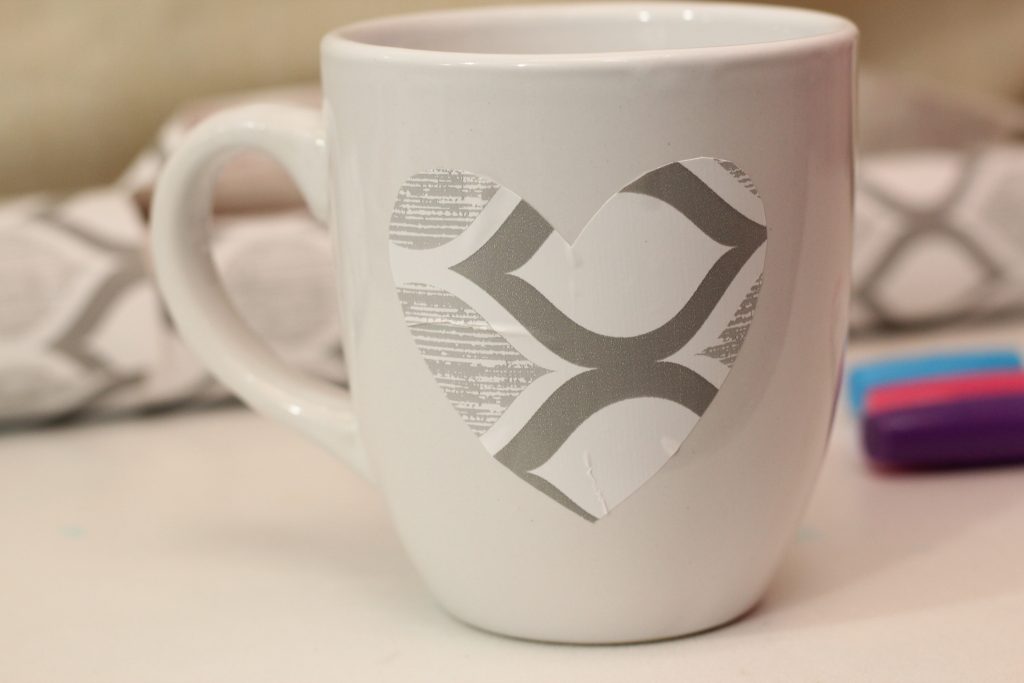
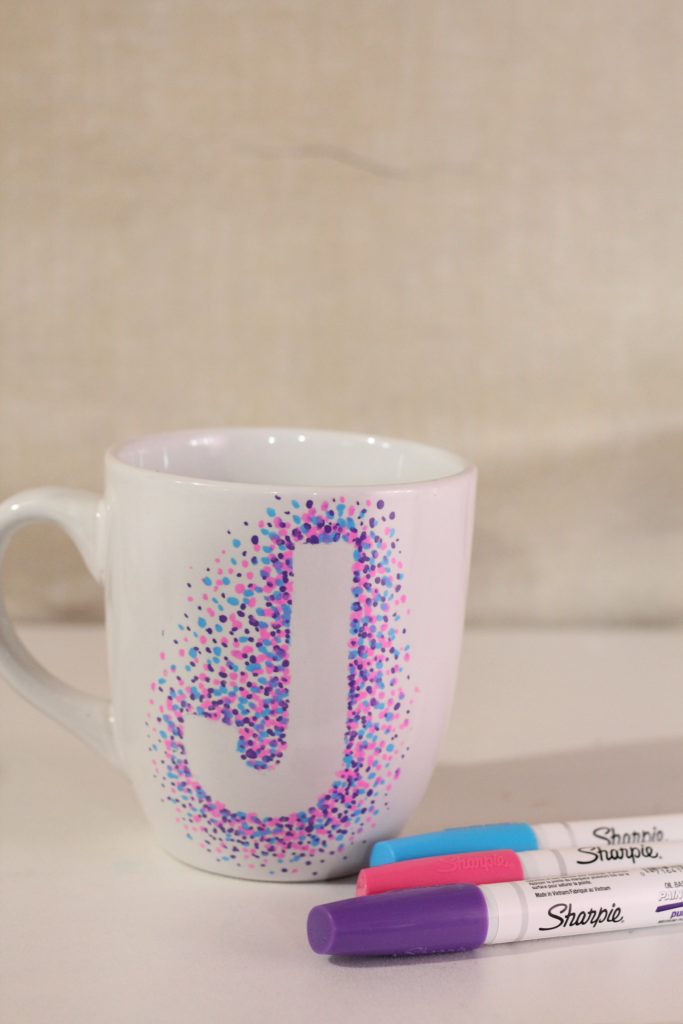
If you're looking for some nifty ideas, a popular trend is to create letter initials. These also make nice gifts. Like the "J" I created below.
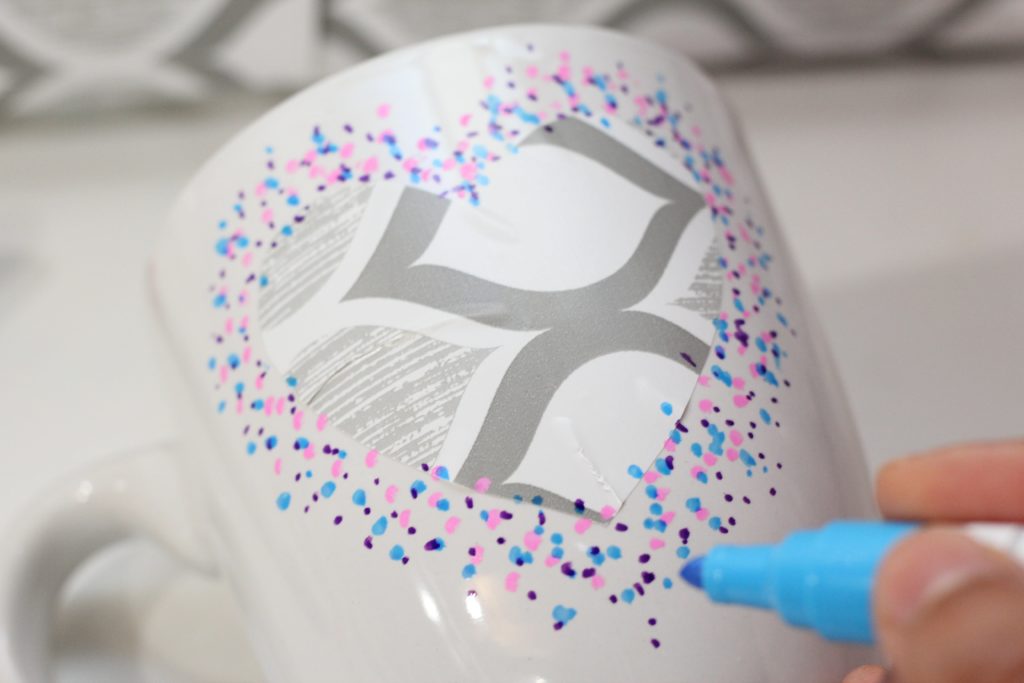
I used a large "J" sticker from the Dollarstore to create the negative space while I made my dots with the Sharpie.
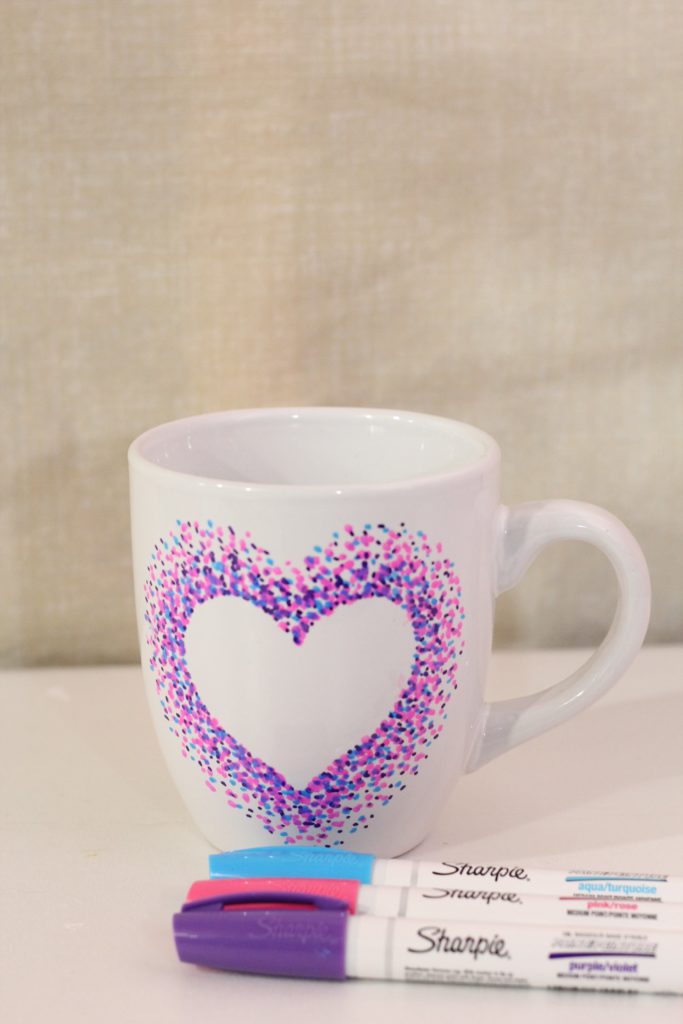
After I lifted the sticker, I was left with the following design.
This post contains affiliate links. For more information, see my disclaimer
Here's a list of other ideas:
- Monogram Letter
- Shapes: hearts, star, moon, mustache etc..
- Meaningful quotes written in your handwriting
- Mandala
- Doodles (by kids or adults!)
- Stencils
The secret to getting the shape/letter looking perfect is: using stickers (like the "J" sticker above) or contact paper! With the contact paper, you can cut out customized shapes and letters, peel and stick them to your mug before you begin.
I also used this method on some Dollarstore Canvases and paints, in this super easy DIY heart painting tutorial.
By the way "contact paper" is the stuff you use to line the bottom of your kitchen shelves (you might even have some at home!)
After your done your design work, you peel the sticker or contact paper away. You're left with a perfect shape or letter with your colorful artwork around it!
It's easy peasy.
This also makes a great craft for kids. They can use their imagination and doodle, scribble, or dot on the mug and when the sticker is lifted it will look super neat!
If you want more inspiration, check out Cool Crafts list of 50 DIY Sharpie Mug ideas. Or you can check out Pinterest and Google.
How to Bake Sharpie Mugs
Once your Sharpie paint is dried on your mug, the next step is to bake it in the oven. This sets the paint even more and cures it.
An important thing to remember is to put your mug into a cold oven, then turn it on. Also, when the time is up, let your mug cool completely in the oven before taking it out. This prevents any cracks in the mug from a sudden temperature change.
In terms of the temperature and timing, bake your Sharpie mug at 250 F for 2 hours.
I have gotten feedback that at higher temperatures, the color change of the Sharpie was quite drastic (and not desirable). Since color preservation is important, I have adjusted the baking instructions to account for this factor.
If the color is absolutely important to you, you can skip baking the Sharpie mug in the oven altogether, and just seal it with special Mod Podge (instructions below). This will result in NO color change, plus your mug will be wash-proof!
TIP: If you really want to set your design to set in, you can bake it in the oven twice
Disclaimer on color change: the color of your Sharpie design can change color once you bake them. Some colors are more prone to color change. Blue's, reds and greens are more prone to changing color when exposed to high temperatures.
Sealing Your Design (For Wash Proofing)
While following the exact directions above should help set in the design so you can gently hand wash them, there are are many variables that can make these designs not last as long such as not cleaning your mug with rubbing alcohol prior to painting, not waiting the full 48 hours for paint to dry using the right oil-based Sharpies, quality of mugs, oven temperature variability, etc..
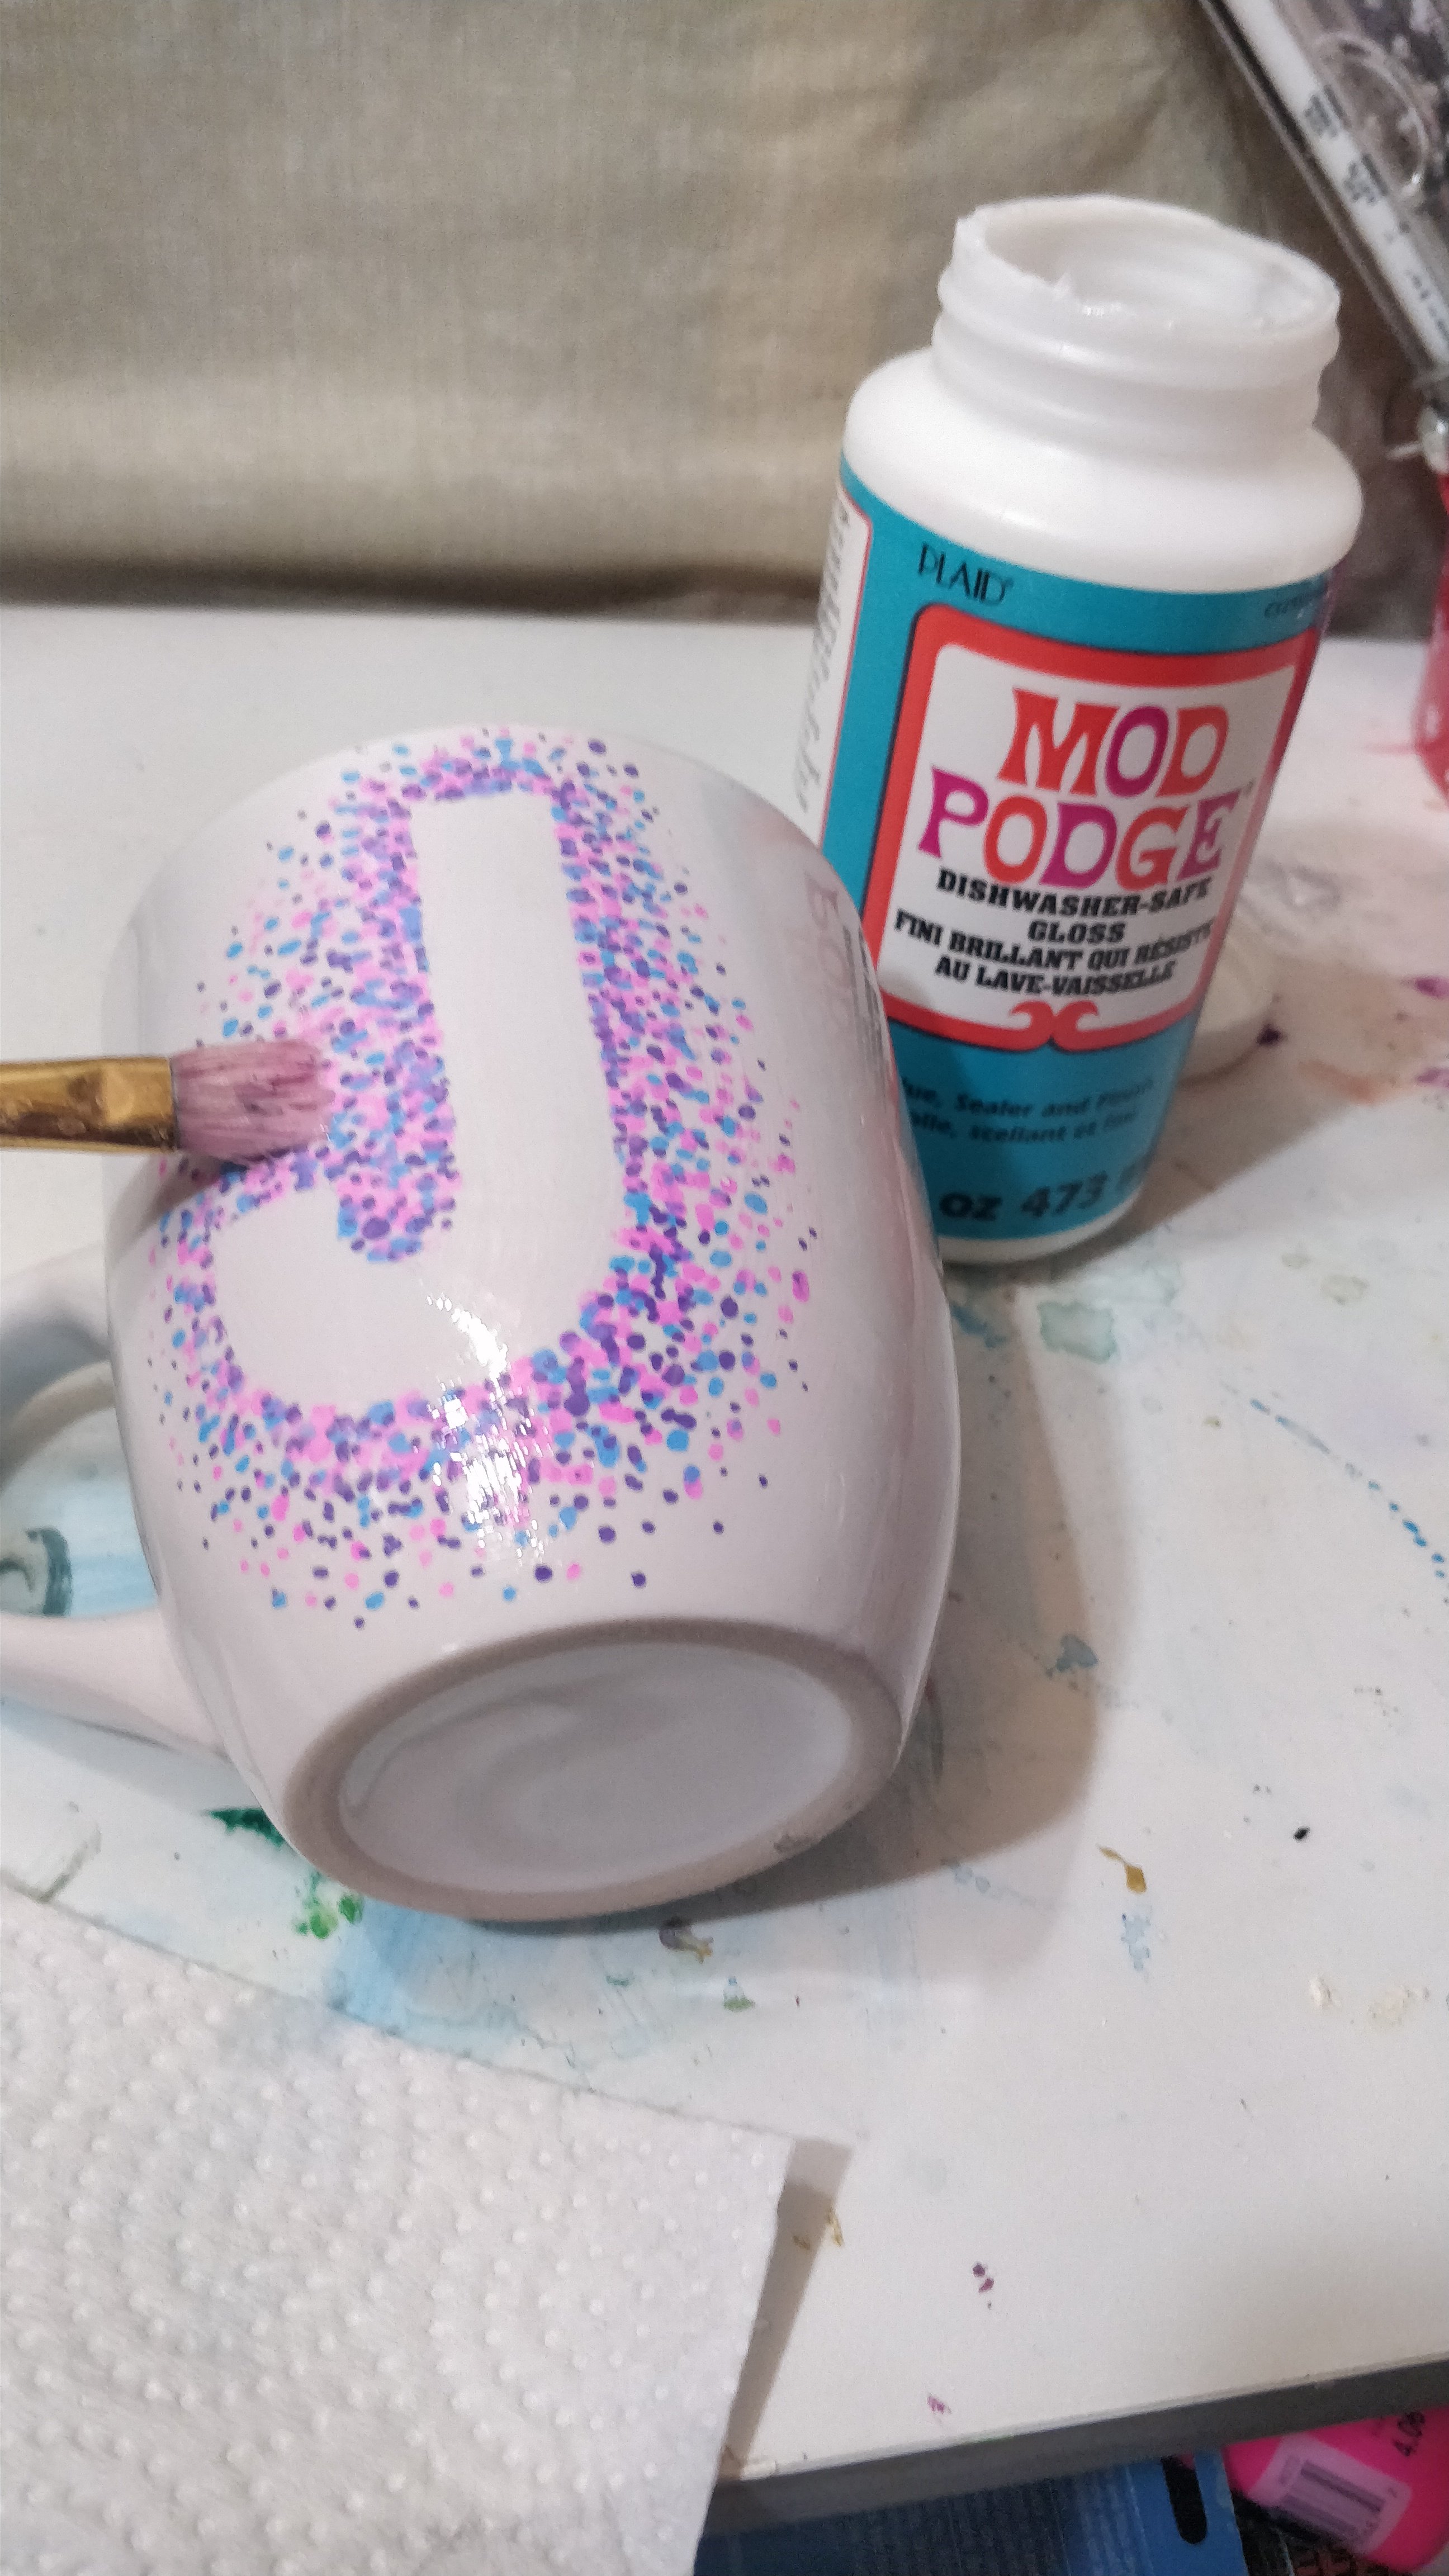
To make sure your design is extra resistant and washable (even top-rack dishwasher safe), add a finishing coat of this Dishwasher Safe Mod Podge.
You can even skip baking your Sharpie in the oven and just seal it with Modge Podge directly. I kept the instructions for baking it, for those who don't have access to this Mod Podge.
Instructions on how to apply the Mod Podge is in the tutorial below

Caring For Your Sharpie Mug
By using oil-based Sharpie markers and baking them in the oven, you should be able to gently hand wash your mug without the paint washing away. You can use regular dish soap and warm water to clean.
DO NOT put in the dishwasher unless you seal them.
If you really want to make these cups Dishwasher safe, or make designs last longer, add a finishing coat of this Dishwasher Safe Mod Podge over your design. Instructions in the tutorial below.
Now that you're armed with some important info on making a DIY Sharpie Mug that's washable, let's get to the tutorial!
How to Make a DIY Sharpie Mug
Materials
- Plain Ceramic mug
- Oil-based Sharpie Markers
- Rubbing alcohol or nail polish remover
- Sticker of your shape or contact paper
- Oven
- Dishwasher Safe Mod Podge.
Step by Step Tutorial
1. This step is important: Take rubbing alcohol or nail polish remover and wipe your mug before you begin. This helps to make sure the mug is free from oils and dirt, so the paint can adhere properly to the mug
If you skip this step, the paint won't stick properly on the mug, risking your design peeling off when washed.
Also, while making your design on the mug, make sure you don't touch the areas where you want your design to go (it will add natural oils to the mug). You can wear non-latex gloves as added protection if you're really worried.
2. Place your sticker on your mug. If you don't have a large enough sticker, you can easily make one with some contact paper ( the stuff you line cupboard shelves with). You can grab some from the Dollarstore.
3. Now take your Sharpies and put dots all around your sticker. I chose pink, purple and blue colors. To make a cool effect, focus on making the dots more concentrated near the edges of the sticker, and fewer dots the further you get away from the sticker. This will give a starburst like effect.
4. Once you're happy with the design, peel away the sticker. If any of the markers got under your shape or letter design, you can use a q-tip and rubbing alcohol to wipe away the excess marker.
5. Leave your mug to dry for 48 hours. This is important. It takes this long for the paint to fully dry. This will let the paint adhere to the mug properly.
6. After 48 hours has passed, it's time to bake your mug. Put your mug in a cold oven then turn it to 250 F. Let it cook for 2 hours. Once 2 hours are passed turn the oven OFF.
7. Let the mug cool completely, IN THE OVEN. Once cooled take it out.
8. Your Sharpie Mug is now done!
How To Seal Ceramic Mugs
If you want to ensure your design is sealed properly use Dishwasher Safe Mod Podge right over top of your Sharpie design. This will also make your mug design dishwasher safe (top rack).
- Roll the bottle of Mod Podge on table to mix (don't shake bottle)
- Pick up some Mod Podge with a clean dry brush ( no water is need to wet brush)
- Apply a thin coat of Mod Podge over the entire ceramic mug, in one direction.
- Leave to dry 1-2 hours
- Apply 2-3 more coats (with 1-2 hour dry time between each coat)
- Leave mug to fully cure for 28 days
- Wash by hand or top rack of dishwasher
Note: I used my mug once the Mod Podge dried, I just made sure I gently hand washed it. I waited closer to 28 days before putting it in dishwasher.
DO NOT USE the regular Mod Podge. Use the one in the link above, it is made specifically formulated to withstand dishwashing.
Extra Safety Precaution with Mod Podge: While this Mod Podge is non-toxic and waterbased, it is not FDA approved as a food-safe material, so do not apply it where it can be in contact with your lips (leave about ¼ to ½ inch from top of cup, Mod Podge free) or on the inside of your cup (where the liquid is).
And that's it! You now everything about making your very own DIY Sharpie mug.
Until next time...stay Nifty!
If you liked this post, Pin it!


Would this work on ceramic mugs purchased at dollar store?
Yes, it should be fine. I used ones from the Dollarstore too.
I used a food grade resin after baking since I all I had were regular sharpies. Dishwasher safe so far...
I used a food grade resin after baking since all I had were regular sharpies....
Dishwasher safe so far...
Great tip Tina!!Thanks for sharing 🙂
@Tina E., what food grade resin did you use?
Do you know if you can bake a set of mugs at one time?
Hi Shery, great question! In theory, you should be able to bake a set at one time- although I have not tried it, but I'm sure it should be OK.
I love this idea for something fun handmade to put some treats in and send them to a couple of friends. I could only get craftsman red, gold and silver so I used red and gold to create a Christmas Tree I cut out from a this piece of cardboard for my stencil. They are turning out cute. However do you have any tricks to doing them as they slide on the China. Just wondering.
Hi Sharlene, your mugs sound adorable!Love the idea about creating a stencil out of cardboard. In terms of it sliding, you could try taping it down, so it won't slide. Then removing the tape when the design is done. Hope that works out!
Hello,
So I was making mugs for my husbands coworker and he is a swim coach so I used blue and orange as that is their color. They looked great until I baked, they turned purple and green. I have no clue why. Help haha
Hey Jenna, some color change is normal but I'm surprised there was such a drastic color change in this case. I was just researching and turns out some specific Sharpie marker colours are more sensitive to the heat in the oven and more prone to changing. If you are able to, you could do a test on mug. Also try reducing the oven to 350 for 40 minutes ( a tip I read from someone with the same issue) to see if that helps keep color more true. Goodluck!!
I want to use the metallic oil based sharpies for a mug cake mug.... do you think the metallic paint will be ok in the microwave?
Hi Stefani! I am not sure if metallic Sharpie pens would be safe in the microwave, to be honest- I would avoid it to be on the safe side.
If using bowls, say for ice cream, can you just use the regular sharpies and seal them with the dishwasher safe ModPodge without having to bake them?
Yes, you should be able to do that just fine. I painted some water bottles recently , without curing then in oven (and just using the Mod Podge) and I had no problems. Just make sure the Mod Podge is not used on the inside of the bowl - as it shouldn't be put anywhere food touches (if using for food). Sounds like a fun project- enjoy Donna!!
Can you use a mug that is not white but a solid color light a light pink or yellow?
Hey Marcia, yes you can absolutely use any color mug! Enjoy!!
Hello! I am posting a comment because I wanted to share my before and after pictures! I read your article saying there would be SOME color change, I used the same, pink, blue, purple, colors you did.... there was a DRASTIC change in color. It almost just looks brown!! I'm very sad as I made 5 mugs for my sons preschool teachers and none of them look as pretty and colorful as they did when I started! They are all dark, look almost brown, and faded.
Sorry to hear about that Brandy. I can understand the disappointment. It's hard to know exactly how different the colors will turn out after you bake them. The temperature of the oven also affects that. Thank you for sharing your experience though -it may help others in advance know there might be drastic changes in color.
Cheers,
Jasmine
There are different directions for baking. 250 for 2 hours and then 425. Is it supposed to be baked twice?
Hi Gretchen, I apologize, the 450 degrees is a part of older instructions. I have updated the tutorial with the 250 degrees for 2 hours timeframe. You only need to bake it once. I hope that helps!
Cheers,
Jasmine
@Jasmine K, #7 doesn't make sense and is out of order. So maybe it should be 5, 6, 7 (formerly 8), 8 (formerly 9)?
Hi Judy,
Thank you for noticing that! You’re right, step #7 didn’t make sense- took it out and update the post. Thanks again for letting me know.
Cheers,
Jasmine
Have you tried this method on unglazed ceramic? Like the paint your own flowerpots at the craft store?
Hi Lea, I haven't had the chance to try on unglazed ceramics- but I'm thinking it could work too!
So I can just buy any type of ceramic and it should work? Does glazed or unglazed matter?
Hi Katie,
This theoretically should work on any glazed ceramic piece. As for the unglazed ceramic: this would probably work better than the glazed variety! But you would have to put it in a proper Kiln afterwards so that it seals the paint with that top shiny coat! Hope that helps.
Cheers,
Jasmine
Hi there. I'm thinking of using this method to make Christmas presents for my family. Could you us any oil based permanent marker or does it have to be Sharpie?
Hi Rachel,
that's a good question. I am not 100% certain on other brands as I have only used Sharpies, but I would imagine a similar outcome. One thing that comes to mind is the colors might change slightly once heated- I know this happens with the oil based Sharpies, not sure if it would be similar/better/worse with other brands. Hope that helps answer you question and enjoy making the project!
Cheers,
Jasmine
Could you bake and seal with modpodge, using both methods.
Hi April,
You could definitely seal with Mod Podge after baking. The only thing thing to keep in mind is the colors may change while baking. If you want your colors to stay true, then you could just do the Mod Podge and skip the baking. Enjoy!
Cheers,
Jasmine
Don't know if this helps but I bake, then I cover with the non-toxic Dishwasher safe Modge Podge. No one has ever told me that it has washed off. I do them for my students each year. Sheryl
Thanks so much for sharing Sheryl! Great advice
Have you found that when applying the mod podge after baking the colors run? I’m trying to follow the tutorial and the colors are starting the run a bit. Do I need to bake them again? Could it be excess oil got on them after baking?
Hi Deneen, sorry to hear the colours are running. I’m assuming you’re using the oil based Sharpies? And yes it is quite possible the paint didn’t adhere properly initially because of excess oil on the mug. It couldn’t hurt baking them again, this could help with making the paint adhere better too. Another thing you could try is to gently apply rubbing alcohol on the mug to remove excess oil and repaint. I hope that helps and let me know if you have any more questions. Cheers,
Jasmine
Do I need to let the paint cure for 48 hours also if I am using Mod Podge?
Hi Cindy,
Waiting the 48 hours will help make sure the paint dries fully and sticks well to the mug. I would wait to be safe.
Cheers,
Jasmine
Can you use regular sharpies (not oil based) if using mod podge and not baking? Also if not baking, do you still have to let the sharpies dry for 48 hours? Is there a mod podge that will still work to protect design but has to be hand washed? Thanks!
Hi Jessica,
Yes you should be fine using regular Sharpies if you’re not baking and using Mod Podge directly on the mug. I would wait the full 48 hours so paint dries fully and sticks to mug ( or if you need sooner you can apply small patch of Mod Podge to make sure design doesn’t run). I would still recommend the Dishwasher Safe Mod Podge. It should work well with hand washing. I haven’t used any other types of Mod Podge so can’t comment if they would work well will hand washing.
Cheers and enjoy!
Jasmine
Hi Jasmine!
If I am using regular Sharpie markers on ceramic mugs and then the dishwasher safe Mod Podge to coat over after, (no baking), how long do I have to wait before applying the first coat of the Mod Podge? I’m doing this activity for my daughter’s tea party and the kids are all going to design their own tea cups/saucers. Any assistance/suggestions would help! Thank you!
Hey Joyce,
It should be okay to coat with the dishwasher safe Mod Podge after the Sharpie is dried to touch. I would use a small patch on the mug to make sure the marker is not lifting when Mod Podge is applied over top ( I haven't tried with regular sharpies, but it should be okay with the Mod Podge). If it's lifting leave it to dry longer(an hour, and try again). Hope your daughter and her friends enjoy making them, what a wonderful idea!
Cheers,
Jasmine
Can you bake more then one mug at a time?
You can absolutely bake more than one mug at a time! Enjoy!
Cheers,
Jasmine
Hi,
Great tutorial. I went through all the comments but didn’t see anyone asking this- too basic question: should it be baked at 250 degrees F or C?
Also, do the baking instructions apply for acrylic paints too??
Thanks!
Thank you so much! I just updated the post and it should be baked at 250 F. As for using acrylic pint on a mug, just searched that up and looks like you can. You can read this article that also includes some important safety precautions and notes about using acrylic on ceramic ( oven instructions and general food safety tips): https://painttopics.com/can-you-bake-acrylic-paint/.
Hope that helps!
Cheers,
Jasmine
Should the Modge Podge be applied before or after baking? Thanks!
Hi Jen,
You don’t have to use mod Podge if baking in the oven. And if using Mod Podge then you shouldn’t put that in the oven. But you can do the oven method then seal it with a layer of mod Podge (although not needed).
Hope that helps!
Jasmine
When I put the mob podge on it smudged my design. Did that happen to you too? Is there a way to prevent that?
Hi Rebecca,
That happened to me a bit when i was working with acrylic paint and steel water bottles. What I did was first let the paint cure for a few hours (24 hours to make sure its really dried), then was super careful with my paint brush when applying the Mod Podge. I used really light brush strokes so it wouldn't disturb the paint underneath. Hope that helps!
Cheers,
Jasmine
My 2 nieces and their brother have just finished their mugs and they did such a good job. Since they are just visiting for a few days we decided to seal them with Mod Podge. Do they paint the Mod Podge over the whole mug or just over their design (initials)?
Hi Stephanie,
So glad you and your neices and nephew enjoyed making these mugs. And good question about the Mod Podge (hope this advice isn't getting to you too late). I would cover just the design with the Mod Podge. You don't want to be putting the Mod Podge or the paint anywhere near where your mouth would be drinking from. If the mug is not being used for drinking from, then you can safely apply the mod podge over the entire mug. Hope that helps.
Cheers,
Jasmine
Hello, I am going to be making these for my friends. After I bake it and it cools, how long after the oven can I apply the mod podge ??? How long before I can ship it with the disclosure to wait the 28 days before putting it in the dishwasher??? How long does Mod podge take to dry??? Thank you
Hi Tiffany,
If you are Mod Podging, then you don't have to put it in the oven. The oven can change the coloration of the Sharpie's, which is why I added a second instruction for applying the Mod Podge as is. As for the shipping time, I can only offer ideas as I have never shipped them myself. You could ship them with a note that they can start using it in the dishwasher on a certain date (the 28 days from the day you applied the last coat). Hope that helps!
Cheers,
Jasmine
I painted 4 beautiful mugs with oil paints from the dollar store but I missed the step of using rubbing alcohol before painting them! I really hope they turn out ok. I am going to try baking them at 250 for 2hs. I'm so sad I didn't do that first, these are Christmas gifts 🙁
Hi Jessica,
I hope your mugs turned out and they brought joy to the recipients!
Cheers,
Jasmine
Can I leave the paint on longer than 48 hours before baking? Like say 60 to 72 hours?
Hey Mona,
Yes you can absolutely leave the Sharpie paint to dry on the painted mug for as long as you'd like actually! The longer you let it dry the better paint adhering. Goodluck!!
Cheers,
Jasmine